
There’s something undeniably comforting about biting into warm, melty Baked Ham and Cheese Sliders fresh from the oven—it’s like a hug for your taste buds on a busy weeknight. I remember the first time I whipped up these Baked Ham and Cheese Sliders for a family game night; the kids devoured them, and even the pickiest eaters asked for seconds. What makes these little gems so irresistible is how they combine juicy ham, gooey cheese, and a buttery topping that crisps up just right.
In my experience, Baked Ham and Cheese Sliders are a game-changer for potlucks or casual gatherings because they’re easy to assemble ahead and bake in under 30 minutes. We’ve all had those days when you need a crowd-pleasing dish without the fuss, right? Let’s be honest, who wouldn’t love a tray of these golden, flavorful sliders staring back at you? I’m excited to share this foolproof recipe so you can create your own memories with these delightful Baked Ham and Cheese Sliders.
Key Takeaways:
- These Baked Ham and Cheese Sliders are perfect for quick meals or parties, serving up to 12 in just 25 minutes total.
- Prep ahead for busy days—assemble the Baked Ham and Cheese Sliders and refrigerate until baking time.
- The buttery poppy seed topping adds a unique crunch and savory flavor to every Baked Ham and Cheese Sliders bite.
- Use high-quality ham and cheese for the best melt and taste in your Baked Ham and Cheese Sliders.
- Store leftovers in the fridge for up to 3 days and reheat to enjoy fresh Baked Ham and Cheese Sliders anytime.
Why You’ll Adore This Baked Ham and Cheese Sliders
Effortless Preparation: Making these Baked Ham and Cheese Sliders couldn’t be simpler—just layer, sauce, and bake. You’ll spend more time enjoying the meal than slaving over the stove, which is a win in my book. It’s the kind of recipe that feels indulgent but takes minimal effort.
Grab This Chef Knife Now - Almost Gone!

- Stays Razor-Sharp: Ice-hardened blade keeps its edge longer than ordinary knives
- Superior Grip Control: Unique finger hole design gives you perfect balance and safety
- Built to Last a Lifetime: Premium stainless steel blade with elegant beech wood handle
- ✓ Finally, a knife that stays sharp and feels comfortable in my hand
- ✓ Professional quality without the premium price tag
- ✓ Makes meal prep faster and more enjoyable
⏰ Only a few items left in stock - order soon
Family-Friendly Appeal: Kids and adults alike go crazy for these sliders; the melty cheese and ham combo is universally loved. I’ve seen them disappear faster than cookies at a bake sale. Plus, they’re customizable, so everyone gets what they want.
Party-Ready Wow Factor: These Baked Ham and Cheese Sliders look impressive on a platter, yet they’re budget-friendly and scalable. The golden tops from baking make them photo-worthy without trying too hard. Serve them at your next event, and you’ll be the hit of the party.
Versatile Comfort Food: Whether it’s game day or a simple dinner, these Baked Ham and Cheese Sliders fit right in. The flavors are classic yet elevated with that tangy mustard butter. You might find yourself craving them weekly!
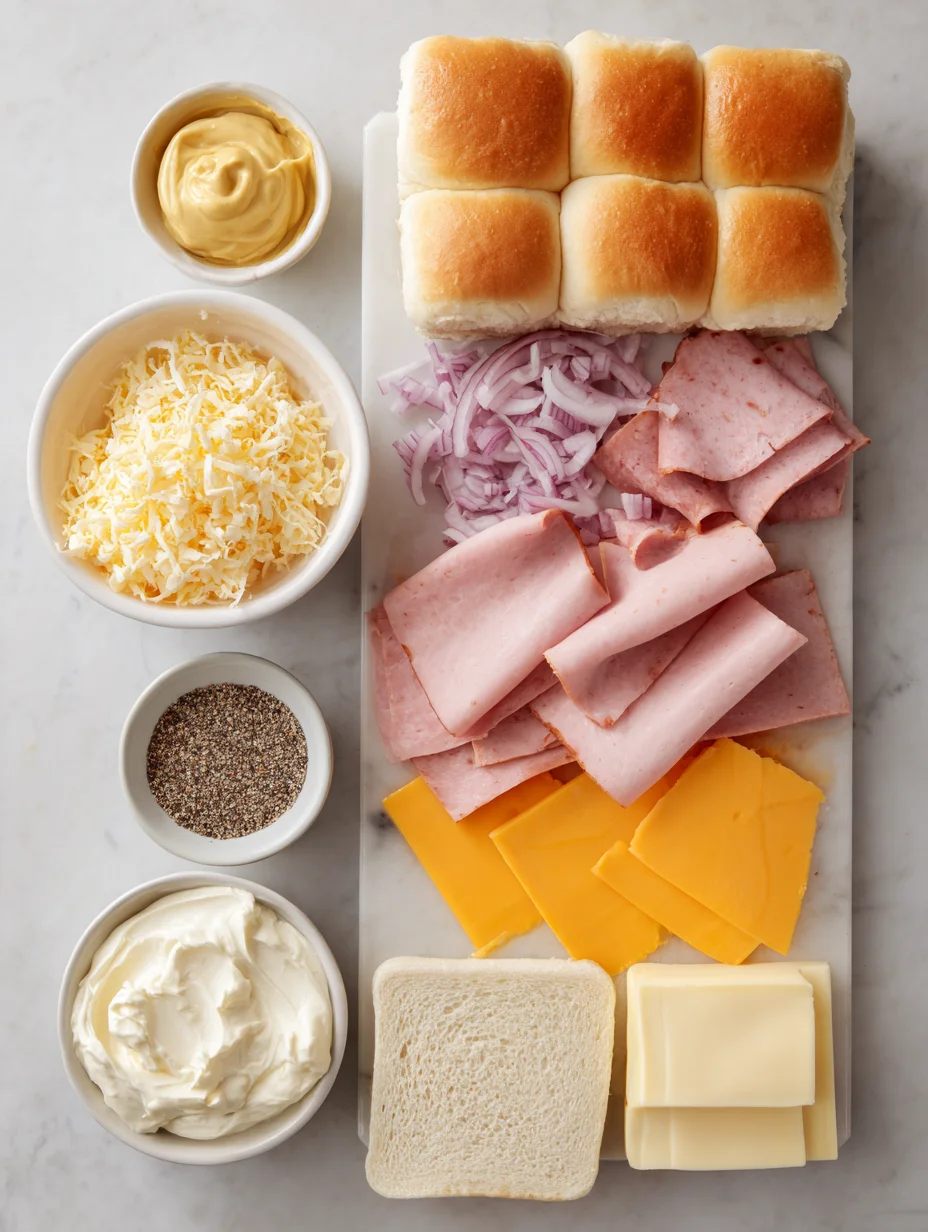
Essential Ingredients for Baked Ham and Cheese Sliders
Slider Buns: These soft, petite buns are the foundation of your Baked Ham and Cheese Sliders, providing the perfect bite-sized base that soaks up all the flavors without falling apart. I always opt for Hawaiian rolls for their subtle sweetness, which pairs beautifully with the savory ham. They’re easy to find and make assembly a breeze, ensuring even the sliders hold together during baking.
Grab This Kitchen Scale Now — Best Precision Pick!

- Razor-Accurate Every Time: Dual-increment precision down to 0.1g — perfect for baking, meal prep, and portion control with g, oz, ml, and fl'oz modes.
- Smart Removable Bowl Design: Detachable bowl doubles as a protective case for compact storage. Tare function lets you weigh ingredients in any container with zero fuss.
- Built for Everyday Convenience: Auto-zero, tare function, low battery alert, overload indicator, and 2-minute auto-off to extend battery life — all in a sleek stainless steel build.
- ✓ "Perfect for baking — precise, lightweight, and stores easily without wasting counter space"
- ✓ "A game changer! Weighing ingredients is now way more accurate than measuring cups"
- ✓ "Love the 0.1g precision and backlight — best food scale I've owned. Highly recommend!"
⏰ Only a few items left in stock - order soon
Deli Ham Slices: Thinly sliced ham brings that smoky, salty goodness essential to Baked Ham and Cheese Sliders, offering protein and a classic taste that everyone associates with comfort. Go for Black Forest or honey ham to add a touch of depth—I’ve tried both, and they never disappoint. Layering them generously ensures juicy results every time.
Cheddar Cheese Slices: The star of the show in these Baked Ham and Cheese Sliders, sharp cheddar melts into a creamy, gooey layer that binds everything together with its bold tang. It contrasts perfectly with the ham, creating that irresistible pull-apart texture. Freshly sliced from the block gives the best melt, elevating your homemade Baked Ham and Cheese Sliders to restaurant quality.
How to Make Baked Ham and Cheese Sliders
Assemble the Layers
Start by preheating your oven to 350°F and greasing a 9×13-inch baking dish— this sets the stage for perfectly Baked Ham and Cheese Sliders. Slice the slider buns in half horizontally to create a base, then layer on the ham slices evenly across the bottoms; I like to fold them slightly for extra height. Top each with a slice of cheddar cheese, ensuring full coverage for that ultimate melt.
Prepare the Buttery Topping
Melt the butter in a small saucepan over low heat, then whisk in Dijon mustard, Worcestershire sauce, and poppy seeds until smooth—this tangy mixture is what makes your Baked Ham and Cheese Sliders unforgettable. Brush it generously over the bun tops before placing them over the filling; the aroma alone will have everyone hovering in the kitchen. Let it sit for a minute to soak in, enhancing every flavorful bite.
Bake to Golden Perfection
Cover the dish with foil and bake for 15 minutes, then uncover and bake another 5-10 minutes until the tops are golden and the cheese is bubbling—this is when your Baked Ham and Cheese Sliders transform into pure magic. Keep an eye on them to avoid over-browning; the edges should be crispy while the centers stay soft. Once out of the oven, let them rest for 5 minutes to set, making slicing a dream.
Ingredients
- 12 slider buns (such as Hawaiian rolls)
- 12 slices deli ham (about 3/4 lb)
- 12 slices cheddar cheese
- 1/2 cup unsalted butter, melted
- 2 tablespoons Dijon mustard
- 1 tablespoon poppy seeds
- 1 teaspoon Worcestershire sauce
- 1/2 teaspoon onion powder
- Salt and pepper to taste
Baked Ham and Cheese Sliders Instructions
- Preheat oven to 350°F (175°C) and grease a 9×13-inch baking dish.
- Slice slider buns in half and place bottoms in the dish. Layer ham and cheese on top.
- Mix melted butter, mustard, poppy seeds, Worcestershire, and onion powder. Brush over bun tops.
- Cover with foil and bake for 15 minutes. Uncover and bake 5-10 more minutes until golden.
- Let cool slightly, then slice and serve your Baked Ham and Cheese Sliders warm.

Pro Tips for the Best Baked Ham and Cheese Sliders
Room Temperature Butter: Let your butter soften before melting for a smoother sauce that coats the Baked Ham and Cheese Sliders evenly.
Fresh Ingredients Only: Use freshly sliced ham and cheese to ensure the best melt and flavor in every Baked Ham and Cheese Sliders.
Don’t Skip the Rest: Allow the sliders to rest post-bake so the cheese sets, preventing a soggy mess when you serve your Baked Ham and Cheese Sliders.
You Must Know
- These Baked Ham and Cheese Sliders are best enjoyed warm for maximum meltiness.
- Poppy seeds add texture, but you can omit them if you prefer a smoother topping.
- The recipe scales easily—double for larger crowds without adjusting bake time much.
- Gluten-free buns work great as a substitute for dietary needs in Baked Ham and Cheese Sliders.
How to Store Baked Ham and Cheese Sliders
To keep your Baked Ham and Cheese Sliders fresh, store them in an airtight container in the fridge for up to 3 days—the cheese stays melty when reheated gently. For longer storage, freeze unbaked sliders wrapped tightly for up to a month, then bake from frozen adding extra time. Reheat in the oven at 325°F for 10-15 minutes to recapture that crispy top without sogginess.
Customizing Your Baked Ham and Cheese Sliders
Feel free to swap cheddar for Swiss in your Baked Ham and Cheese Sliders for a milder flavor, or add pickles for a tangy twist that reminds me of classic deli sandwiches. If you’re going veggie, try turkey or plant-based ham alternatives—they bake up just as well. For spice lovers, a dash of hot sauce in the butter mix elevates these sliders without overpowering. Check out our cheesy ground beef quesadillas for more melty inspiration.
What to Serve with Baked Ham and Cheese Sliders
Pair these sliders with a crisp coleslaw for crunch and freshness that balances the richness. A simple green salad with vinaigrette or potato chips on the side keeps things casual and easy. For drinks, iced tea or lemonade complements the savory notes perfectly. If you’re feeling fancy, add sweet potato fries for a hearty twist.

Baked Ham and Cheese Sliders
Score a touchdown on your game-day menu with these Baked Ham & Cheese Sliders! Perfect for casual gatherings, these cheesy, buttery, savory sliders are easy to make and irresistibly tasty.
Timing
Recipe Details
Ingredients
- 01 1 package King's Hawaiian Original Sweet Rolls ((12-count))
- 02 3 tablespoons mayonnaise
- 03 2 tablespoons Dijon mustard
- 04 1/2 pound thinly-sliced deli ham ((such as Black Forest))
- 05 1/4 pound deli-sliced sharp cheddar cheese
- 06 1/4 pound deli-sliced Swiss cheese
- 07 4 tablespoons unsalted butter (, melted)
- 08 1 teaspoon Worcestershire sauce
- 09 1-1/2 teaspoons poppy seeds
- 10 1/2 teaspoon onion powder
- 11 pinch kosher salt (, if needed)
Instructions
To make the slider spread, stir together mayonnaise and 2 tablespoons Dijon mustard in a small bowl. Set aside.
Using a serrated bread knife, slice the slider buns in half to separate the tops from the bottoms. Place them, cut side up, on a baking sheet.
Preheat your oven's broiler to high with the rack in the second position down from the top (this should be about 6 inches from the broiler element). Broil the rolls on the cut-sides only for 1-2 minutes, until lightly toasted. Watch them closely and do not walk away from the oven, as they can burn quickly! Broiling times may vary by oven.
Preheat the oven to 350 degrees F with the rack in the middle position. Lightly spray a glass or light-colored ceramic baking dish with cooking spray. (If using a pan with a darker interior, reduce the oven temperature to 325 degrees F.)
Place the bottom half of the toasted rolls in the prepared baking dish. Spread a little more than half of the Dijon-mayo mixture onto the rolls in the baking dish.
Assemble the sliders by layering the cheeses and meat in the following order: cheddar cheese, ham, Swiss cheese. Spread the remaining Dijon-mayo onto toasted side of the top half of the rolls and place them over the Swiss cheese layer.
In a small bowl, combine the melted butter, Worcestershire sauce, poppy seeds, onion powder, and a pinch of salt (if using). Pour over the sliders, using a basting brush or pastry brush to distribute the butter and poppy seeds evenly over the tops and sides. It's ok if some of the butter pools around the sliders in the baking dish.
Cover with foil and let stand for 5 minutes. Bake for 20 minutes, until the sliders are heated through and the cheese is melted. Remove the foil and continue baking for 5-10 minutes, until the tops of the rolls are golden and crispy. Watch them carefully during the last stage of baking so they don't get too dark.
Let the sliders stand for a few minutes and cut the rolls into individual servings. Serve hot with potato chips, fries, or your favorite sandwich sides.
FILED UNDER:
NUTRITION FACTS (PER SERVING)
Nutrition information is calculated using an ingredient database and should be considered an estimate. In cases where multiple ingredient alternatives are given, the first listed is calculated for nutrition. Garnishes and optional ingredients are not included.
Frequently Asked Questions About Baked Ham and Cheese Sliders
Can I make Baked Ham and Cheese Sliders ahead of time?
Absolutely, assemble the Baked Ham and Cheese Sliders up to 24 hours in advance and refrigerate covered. Just add 5 extra minutes to the bake time when ready. This make-ahead trick is a lifesaver for busy hosts.
How long does Baked Ham and Cheese Sliders last in the fridge?
Your Baked Ham and Cheese Sliders will stay good for 3-4 days in the fridge if stored properly in an airtight container. Reheat in the oven to maintain texture. Avoid microwaving to prevent sogginess.
Are Baked Ham and Cheese Sliders gluten-free?
Not by default, but you can easily make them gluten-free with special slider buns. The rest of the ingredients are naturally GF. It’s a quick swap for inclusive meals.
Can I use a different cheese in Baked Ham and Cheese Sliders?
Yes, Swiss or provolone work wonderfully in place of cheddar for your Baked Ham and Cheese Sliders, offering varied flavors. Experiment to find your favorite melt. For more cheesy ideas, try our air fryer low-carb tuna melts.
What’s the best ham for these sliders?
Opt for thinly sliced deli ham like honey or smoked for optimal flavor and tenderness in the sliders. Thicker cuts can work but may need trimming. Freshness is key for the best results.
How do I make Baked Ham and Cheese Sliders spicier?
Add sliced jalapeños or a pinch of cayenne to the butter mixture for heat in your Baked Ham and Cheese Sliders. It adds excitement without much effort. Start small to suit your taste.
Can I freeze Baked Ham and Cheese Sliders?
Freeze assembled but unbaked Baked Ham and Cheese Sliders for up to a month, then thaw and bake as directed. This method preserves quality best. They’re great for meal prep.
Why are my Baked Ham and Cheese Sliders soggy?
Sogginess often comes from not baking uncovered long enough—aim for that golden top. Use fresh buns too. If issues persist, try baking on a wire rack next time.
Final Thoughts
These Baked Ham and Cheese Sliders have become a staple in my home, blending simplicity with crowd-pleasing flavors that bring everyone to the table smiling. Whether you’re hosting or just need a quick win, this recipe delivers every time. Give these Baked Ham and Cheese Sliders a try this week—I promise you’ll be hooked and sharing the love with friends. What’s your favorite twist? Let me know in the comments!