
There’s nothing quite like the warm, comforting aroma of a freshly baked Apple Pie filling your kitchen—it’s the scent of fall gatherings and cherished family traditions. I’ve always believed that the best Apple Pie isn’t just about the flaky crust or the sweet-tart filling; it’s about the memories it creates. Whether you’re a baking novice or a seasoned pro, making this homemade Apple Pie will transport you straight to grandma’s table.
In my experience, the key to an unforgettable Apple Pie lies in using fresh, crisp apples and a touch of personal flair. Now, you might be thinking, “Can I really pull off a perfect Apple Pie at home?” Absolutely—let’s dive into this easy Apple Pie recipe that’s become my go-to for holidays and cozy evenings. I’m excited to share every step with you, so you can bake your own slice of heaven today.
Here’s the thing: this Apple Pie isn’t overly complicated, yet it delivers that golden, bubbling goodness every time. Pair it with a scoop of vanilla ice cream, and you’ve got dessert nirvana. Trust me, once you try this, it’ll be your new favorite way to make Apple Pie.
Grab This Chef Knife Now - Almost Gone!

- Stays Razor-Sharp: Ice-hardened blade keeps its edge longer than ordinary knives
- Superior Grip Control: Unique finger hole design gives you perfect balance and safety
- Built to Last a Lifetime: Premium stainless steel blade with elegant beech wood handle
- ✓ Finally, a knife that stays sharp and feels comfortable in my hand
- ✓ Professional quality without the premium price tag
- ✓ Makes meal prep faster and more enjoyable
⏰ Only a few items left in stock - order soon
Key Takeaways:
- Classic homemade Apple Pie with a buttery crust and spiced apple filling that’s perfect for any occasion.
- Prep and bake in under 2 hours for a quick, crowd-pleasing treat without sacrificing flavor.
- Balanced sweet-tart taste from fresh apples and warm cinnamon that melts in your mouth.
- Chill your dough for flakier results—it’s a simple step that elevates your Apple Pie.
- Store leftovers at room temperature for up to 2 days or refrigerate for a week to keep it fresh.
Why You’ll Adore This Apple Pie
Timeless Comfort in Every Bite: This Apple Pie brings back that nostalgic warmth we all crave, with its golden crust cradling juicy apples. It’s not just dessert; it’s a hug on a plate. I find it impossible not to smile when slicing into one I’ve just baked.
Simple Yet Impressive Results: Even if baking intimidates you, this recipe makes a stunning Apple Pie with minimal effort. The compliments will roll in, and you’ll feel like a pro. Let’s be honest, who doesn’t love an easy win in the kitchen?
Versatile for Any Season: While fall screams Apple Pie, it shines year-round with seasonal twists. Add fresh berries in summer or nuts in winter for variety. It’s endlessly adaptable to your tastes.
Family-Friendly Fun: Get the kids involved in peeling apples—it’s a bonding experience that turns baking into playtime. Watching their faces light up over the finished Apple Pie? Priceless. This recipe creates lasting memories alongside deliciousness.
Grab This Kitchen Scale Now — Best Precision Pick!

- Razor-Accurate Every Time: Dual-increment precision down to 0.1g — perfect for baking, meal prep, and portion control with g, oz, ml, and fl'oz modes.
- Smart Removable Bowl Design: Detachable bowl doubles as a protective case for compact storage. Tare function lets you weigh ingredients in any container with zero fuss.
- Built for Everyday Convenience: Auto-zero, tare function, low battery alert, overload indicator, and 2-minute auto-off to extend battery life — all in a sleek stainless steel build.
- ✓ "Perfect for baking — precise, lightweight, and stores easily without wasting counter space"
- ✓ "A game changer! Weighing ingredients is now way more accurate than measuring cups"
- ✓ "Love the 0.1g precision and backlight — best food scale I've owned. Highly recommend!"
⏰ Only a few items left in stock - order soon
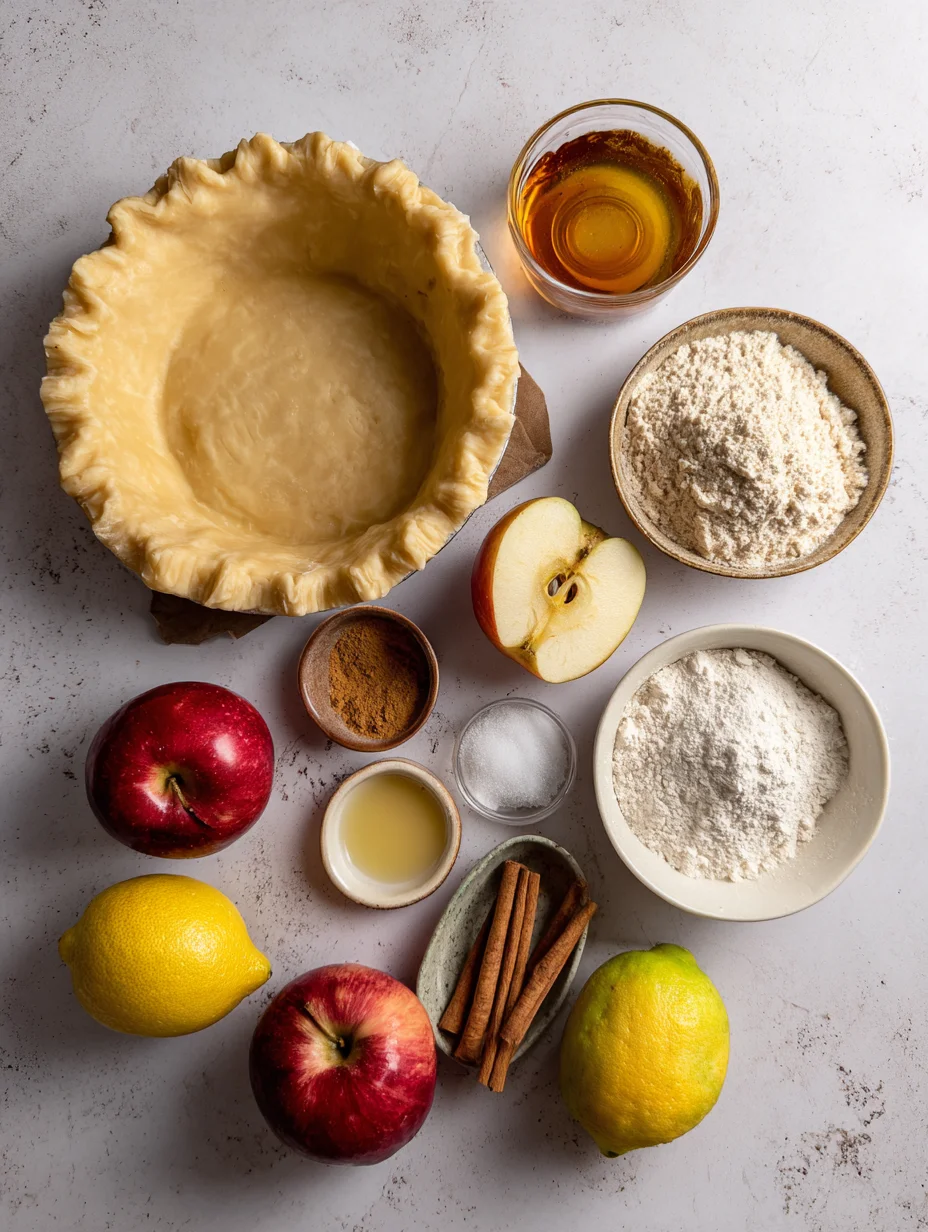
Essential Ingredients for Apple Pie
Fresh Apples: The heart of any great Apple Pie, choose a mix of Granny Smith for tartness and Honeycrisp for sweetness to balance flavors perfectly. They hold up well during baking, releasing just enough juice without making the filling soggy. In my experience, about 6-7 medium apples give you the ideal texture and volume for this Apple Pie.
Unsalted Butter: This is crucial for the flaky pie crust—cold butter creates those delightful layers when it melts in the oven. It also adds richness to the filling when dotted on top of the apples. Use high-quality butter for the best results; it really elevates the overall taste.
Ground Cinnamon: The warm spice that defines classic Apple Pie, cinnamon enhances the apples’ natural sweetness without overpowering. A teaspoon or so infuses the entire pie with cozy aroma. What I find interesting is how it ties all the flavors together seamlessly.
How to Make Apple Pie
Prepare the Pie Crust
Start by combining flour, salt, and cold cubed butter in a bowl until it resembles coarse crumbs—this is the base for your Apple Pie’s signature flaky crust. Gradually add ice water to form a dough, then divide it into two discs and chill for at least 30 minutes. In my experience, this resting time prevents a tough crust and makes rolling out a breeze. Roll one disc on a floured surface to fit your 9-inch pie plate, gently pressing it into the bottom and sides.
Make the Apple Filling
Peel, core, and slice your apples into thin pieces, tossing them with sugar, cinnamon, flour, and a squeeze of lemon juice to prevent browning and add brightness. The mixture should look glossy and fragrant, with the apples coated evenly. Layer this into the prepared crust, mounding slightly in the center for that classic dome effect. Dot with butter pats to infuse extra richness as it bakes.
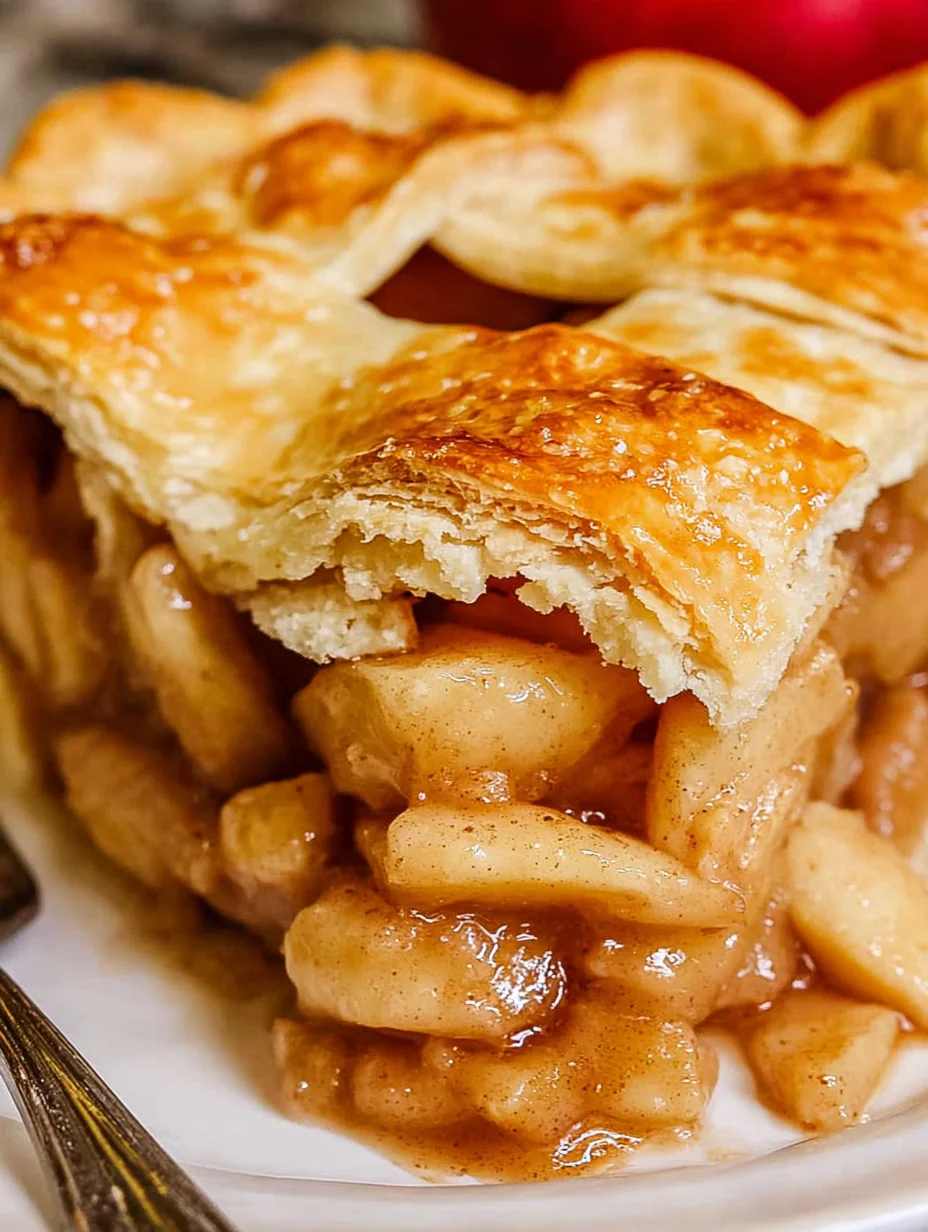
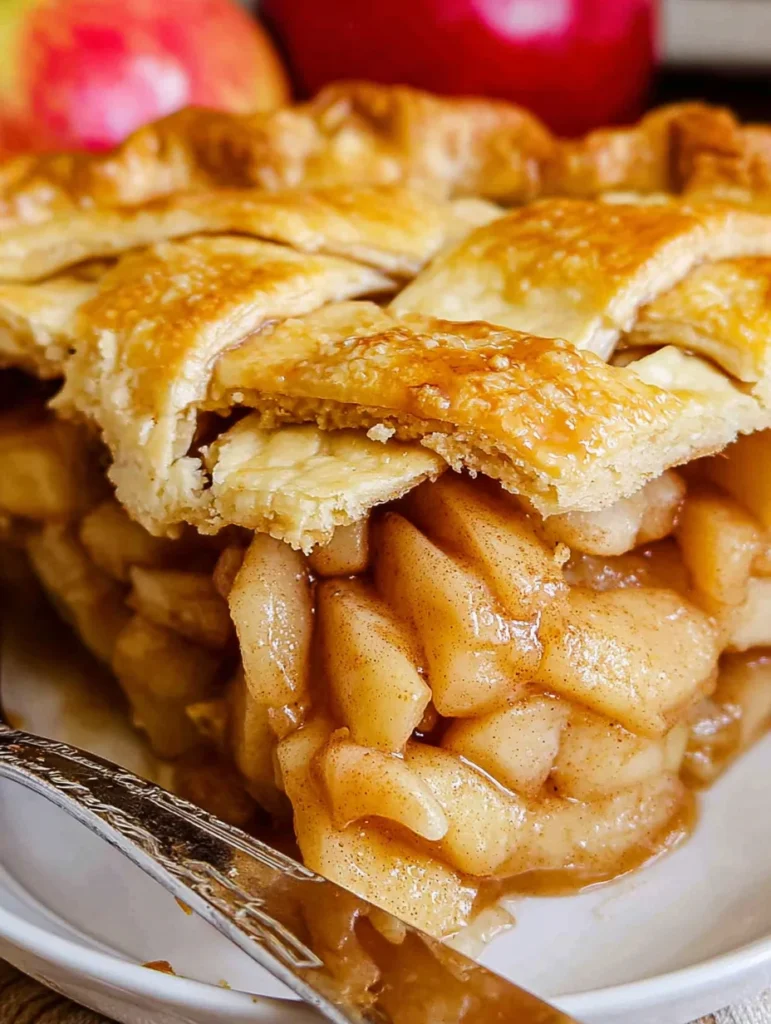
Assemble and Bake the Apple Pie
Roll out the second dough disc for the top crust, or create a lattice for a beautiful touch—either way, it seals in all the juices for the perfect Apple Pie. Trim and crimp the edges, then brush with egg wash and sprinkle sugar for a shiny finish. Bake at 375°F for 45-50 minutes until the crust is golden and the filling bubbles. Let it cool slightly before serving to set the filling just right.
Ingredients
- For the Crust:
- 2 ½ cups all-purpose flour
- 1 teaspoon salt
- 1 cup unsalted butter, cold and cubed
- 6-8 tablespoons ice water
- For the Filling:
- 6-7 medium apples (mix of tart and sweet varieties), peeled, cored, and sliced
- ¾ cup granulated sugar
- 2 tablespoons all-purpose flour
- 1 teaspoon ground cinnamon
- ¼ teaspoon ground nutmeg
- 1 tablespoon lemon juice
- 2 tablespoons unsalted butter, cut into small pieces
- 1 egg, beaten (for egg wash)
- 1 tablespoon coarse sugar (for sprinkling)
Apple Pie Instructions
- Prepare the crust: Mix flour and salt in a large bowl. Cut in cold butter until crumbly. Add ice water gradually until dough forms. Divide into two discs, wrap, and chill for 30 minutes.
- Preheat oven to 375°F. Roll out one dough disc and fit into a 9-inch pie plate.
- For filling: Toss sliced apples with sugar, flour, cinnamon, nutmeg, and lemon juice. Pour into crust and dot with butter.
- Roll out second dough for top crust or lattice. Place over filling, crimp edges, and cut slits for steam. Brush with egg and sprinkle sugar.
- Bake for 45-50 minutes until golden. Cool on a wire rack for at least 1 hour before serving.
Pro Tips for the Best Apple Pie
Chill the Dough Thoroughly: Always refrigerate your pie dough for at least 30 minutes to keep it from shrinking during baking.
Prevent Soggy Bottom: Bake on the lowest oven rack to ensure the crust crisps up perfectly.
Apple Variety Matters: Mix tart and sweet apples for the most flavorful filling in your Apple Pie.
You Must Know
- This Apple Pie recipe yields 8 servings, ideal for family dinners or potlucks.
- Use a glass pie plate for even baking and to monitor the crust’s golden color.
- Freshly ground cinnamon amplifies the warm spices in the filling.
- Let the pie cool completely to avoid runny slices—patience pays off.
How to Store Apple Pie
Once cooled, cover your Apple Pie loosely with foil and store at room temperature for up to 2 days to maintain its flaky crust. For longer storage, refrigerate in an airtight container for up to 5 days; the flavors even deepen overnight. To reheat, warm slices in a 350°F oven for 10-15 minutes or microwave briefly for that fresh-baked taste.
Customizing Your Apple Pie
Swap in pears or add cranberries for a seasonal twist on this classic Apple Pie. If you’re gluten-free, use a store-bought alternative crust or check out our fudgy chewy brookies recipe for inspiration on easy dough swaps. Reduce sugar for a less sweet version, or mix in walnuts for crunch—experiment to make it your own. These variations keep the Apple Pie versatile for any dietary needs.
What to Serve with Apple Pie
A scoop of vanilla ice cream is the ultimate classic pairing, melting into the warm slices for creamy contrast. For a lighter option, try whipped cream or Greek yogurt to balance the sweetness. Serve alongside sharp cheddar cheese for a savory twist, or pair with hot cider or coffee to enhance those fall vibes. If you’re hosting, add a simple green salad to round out the meal without overwhelming the pie’s star status.
Best Recipe for Apple Pie
This classic recipe has a double crust (you won't miss that crumble), a cooked filling for the best texture and flavor, and is super easy. I'll show you how to make it from scratch!
Timing
Recipe Details
Ingredients
- 01 1 homemade double pie crust ((2 sheets of pie dough))
- 02 1/4 teaspoon lemon zest
- 03 2 tablespoons lemon juice ((juice from half a lemon))
- 04 5 pounds apples ((before peeling and coring, about 11 large apples))
- 05 3/4 cup brown sugar ((packed))
- 06 3/4 cup granulated sugar
- 07 5 tablespoons all purpose flour
- 08 1/4 teaspoon kosher salt
- 09 1 1/2 teaspoons cinnamon
- 10 3/4 teaspoon nutmeg
- 11 1/2 teaspoon cardamom ((optional))
- 12 1 teaspoon vanilla
- 13 1 tablespoon milk ((for brushing on pie))
- 14 1 tablespoon beaten egg ((optional, for brushing on pie))
- 15 1 tablespoon raw sugar ((for topping pie))
Instructions
Choose your apples. You need 5 pounds of apples for this recipe, which is about 11 large apples. I like to use a mix of apples for the best flavor. For this pie I used Granny Smith, Gala, and Golden Delicious.
Make the filling: Use a microplane grater to zest 1/4 teaspoon lemon peel into a 12 inch high sided skillet.
Add the juice from half the lemon to the skillet, about 2 tablespoons.
Use a potato peeler or this handy apple peeler to peel the apples. Slice the apples into 1/8 inch pieces. Check out the photos above to see my method for slicing apples. I like to peel and slice one apple at a time so that they don't get brown; I peel one apple, then stop and slice it, add it to the lemon juice, and then move on to peeling the next apple. Stir the apples in the pan occasionally to coat everything with lemon juice.
Once you have all the apples peeled and sliced in the pan, set it over medium heat on the stove.
Add 3/4 cup packed brown sugar, 3/4 cup granulated sugar, 5 tablespoons flour, 1/4 teaspoon salt, 1 and 1/2 teaspoons cinnamon, 3/4 teaspoon nutmeg, and 1/2 teaspoon cardamom. Stir it together gently so you don't break all the apples.
Once the mixture is all moistened and you don't see patches of flour or cinnamon, set a timer for 20 minutes. Cover the mixture with a lid but don't walk away. Stick around and stir the mixture every 3 minutes or so, Replacing the lid each time. Cook for 20 minutes, until the apples are fork tender but still hold their shape. The apples will not soften more while baking in the oven. So have a taste and see if you want to cook a longer or shorter time. Only you can know your apple al dente perfection level.If your apples start to stick to the pan, add 1 tablespoon water as needed; use sparingly.
Remove the pan from heat and stir in 1 teaspoon vanilla.
Transfer the apple pie filling (including the brown caramel gooeyness) to a half sheet pan, or any pan with a lip. Spread the apples all the way to the edges. Cool the apple pie filling completely by placing it in the fridge or the freezer, it only takes 30 minutes or so. (If you have plenty of time, you can just leave the apples in the pan to cool down; it will take a couple hours.)
Roll out your pie dough and place in a deep 9 inch pie dish, with the excess hanging over the edges. See my pie crust post for lots of photos and details.
Use a rubber spatula to scrape all the chilled apple pie filling into the pie dish. Don't forget to scrape in every last bit of the gooey filling.
Top your pie with the other pie crust. Follow this recipe for How to Make a Lattice Pie Crust, if you like. It's so pretty and not as hard as you think. You can also just toss the crust on whole. It's going to taste delicious either way! See my pie crust recipe for details on topping with a whole crust.
Fold the edges in and crimp however you like. If you didn't do a lattice, make sure to vent your pie by poking the top a few times with a sharp knife.
Place the whole pie in the fridge or freezer for about 20-30 minutes, for a really flaky crust.
Place a baking sheet in the center rack of your oven and preheat to 425 degrees F. Let it heat up for at least 20-25 minutes to make sure it's really hot.
Right before putting it in the oven, brush the crust of your pie all over with milk or egg, or both. I like to use 1 tablespoon milk beat together with 1 tablespoon beaten egg that I have leftover from making my homemade pie crust. You can just use milk if you don't have beaten egg lying around. Milk will help your pie crust brown but will stay matte; egg will add gloss and shine to your pie crust.
Sprinkle the whole pie with raw sugar, or regular sugar is fine too.
Place the chilled pie onto the baking sheet in the oven and let bake for 15 minutes. The crust on the edge should be turning light brown.
Meanwhile, get a square of tin foil that is the same size as your pie. Fold it in half, then in half again. Cut out the center. Open it up again. You should have a square of foil with a circle cut out of the center. See pie crust post for photos.
Reduce the heat to 350 degrees F. Remove the pie from the oven and place the foil on top. Loosely crimp it around the crust on the edge. This will protect it from burning.
Don't forget to lower the oven temperature to 350. Place the pie back on the baking sheet in the oven and bake at 350 for 40-45 more minutes.
You will know the pie is done when the edges are brown and the center is light golden brown. If you did a lattice crust, you should see the filling bubbling away nicely.
Let the pie cool on a wire rack for about 4 hours. I know, this is killer. But if you cut into it now, the juices will be lava hot and way too liquid-y. You have to wait for it to cool to room temperature to get the right texture for the filling. Pie! A lesson in patience indeed.
Once the pie is completely cool, slice and serve! My husband Eric considers it a crime to serve this without vanilla ice cream, and I tend to agree. Treat yoself right. Add in some caramel sauce for a really decadent treat!
Store the pie on the counter for up to 2 days, covered with plastic wrap. After that transfer it to the fridge.
FILED UNDER:
NUTRITION FACTS (PER SERVING)
Nutrition information is calculated using an ingredient database and should be considered an estimate. In cases where multiple ingredient alternatives are given, the first listed is calculated for nutrition. Garnishes and optional ingredients are not included.
Frequently Asked Questions About Apple Pie
Can I make Apple Pie ahead of time?
Yes, assemble your Apple Pie up to 24 hours in advance and refrigerate before baking— it actually enhances the flavors as they meld. Just add 5-10 extra minutes to the bake time if baking from cold. This is perfect for holiday prep without last-minute stress.
How long does Apple Pie last in the fridge?
Properly stored in an airtight container, Apple Pie stays fresh for up to 5 days in the fridge. The crust might soften slightly, but reheating crisps it right up. For best taste, enjoy within 3 days.
What’s the best apple for Apple Pie?
A mix of Granny Smith and Honeycrisp works wonders for tartness and sweetness in Apple Pie. They hold shape well without turning mushy. Avoid overly soft varieties like Red Delicious for the filling.
Can I freeze unbaked Apple Pie?
Absolutely, wrap your assembled Apple Pie tightly in plastic and foil, then freeze for up to 3 months. Thaw overnight in the fridge before baking as directed. This method makes your Apple Pie a convenient make-ahead dessert.
Why is my Apple Pie crust tough?
Overworking the dough or using warm butter often causes toughness—keep everything cold and handle gently. Resting the dough in the fridge helps too. With practice, you’ll nail that tender Apple Pie crust every time.
How do I make a lattice top for Apple Pie?
Roll out strips of dough, weave them over the filling in a crisscross pattern, then trim and crimp edges. It adds a beautiful, rustic look to your Apple Pie while allowing steam to escape. Brush with egg for shine and bake as usual.
Is Apple Pie vegan possible?
Yes, substitute vegan butter or shortening in the crust and skip the egg wash, using plant-based milk instead. For the filling, it’s naturally vegan-friendly. Your Apple Pie will be just as delicious without dairy.
Can I use store-bought crust for Apple Pie?
Definitely—it’s a time-saver for busy days, and the results are still fantastic. Just follow the package directions for handling. Elevate it by adding our tips for the best-tasting Apple Pie filling.
Final Thoughts
From the first bite to the last crumb, this Apple Pie recipe delivers comfort and joy in every slice—it’s the kind of dessert that brings people together. I’ve shared it with friends and family countless times, and it never fails to impress. Why not bake one this weekend? Head to the kitchen, gather your ingredients, and create your own homemade Apple Pie magic today—you won’t regret it.