
There’s something undeniably comforting about a warm, bubbly dish straight from the oven on a chilly evening, and that’s exactly what my Cheesy Root Vegetable Gratin delivers every time. I’ve been making this Cheesy Root Vegetable Gratin for years, ever since I discovered how root vegetables like potatoes, carrots, and parsnips transform into a creamy, cheesy masterpiece when layered and baked. It’s the kind of recipe that feels like a hug from your grandma, but with a modern twist that makes it perfect for weeknight dinners or holiday gatherings.
In my experience, the magic of Cheesy Root Vegetable Gratin lies in its simplicity—you don’t need fancy ingredients to create something so indulgent. What I love most is how the earthy flavors of the roots meld with the gooey cheese, creating layers of texture and taste that keep you coming back for seconds. If you’re looking for an easy way to elevate your side dish game, this is it.
Today, I’m thrilled to share my go-to recipe for Cheesy Root Vegetable Gratin, complete with tips to make it your own. Whether you’re a seasoned cook or just starting out, you’ll find it straightforward and rewarding. Let’s dive in and get that oven preheated!
Grab This Chef Knife Now - Almost Gone!

- Stays Razor-Sharp: Ice-hardened blade keeps its edge longer than ordinary knives
- Superior Grip Control: Unique finger hole design gives you perfect balance and safety
- Built to Last a Lifetime: Premium stainless steel blade with elegant beech wood handle
- ✓ Finally, a knife that stays sharp and feels comfortable in my hand
- ✓ Professional quality without the premium price tag
- ✓ Makes meal prep faster and more enjoyable
⏰ Only a few items left in stock - order soon
Key Takeaways:
- Cheesy Root Vegetable Gratin is a cozy, crowd-pleasing side dish that’s perfect for fall and winter meals.
- Prep time is just 20 minutes, with most of the work happening in the oven for hands-off cooking.
- The creamy cheese sauce and tender roots create an irresistible flavor profile that’s rich yet balanced.
- Slice vegetables thinly for even cooking and maximum cheesiness in every bite.
- Store leftovers in the fridge for up to 4 days; reheat in the oven to maintain crisp topping.
Why You’ll Adore This Cheesy Root Vegetable Gratin
Comfort Food Classic: Nothing beats the nostalgia of a baked gratin, and this Cheesy Root Vegetable Gratin takes it up a notch with vibrant root veggies that add natural sweetness. I’ve served it at family dinners, and it always steals the show—it’s hearty without being heavy. You’ll love how it warms you from the inside out.
Versatile for Any Occasion: Whether it’s a casual weeknight or a festive holiday spread, this dish fits right in. The beauty is in its adaptability; you can scale it for two or twenty with ease. Honestly, it’s one of those recipes that makes hosting feel effortless and fun.
Nutrient-Packed Goodness: Root vegetables bring fiber, vitamins, and antioxidants to the table, all wrapped in that delicious Cheesy Root Vegetable Gratin comfort. It’s a sneaky way to get veggies into picky eaters’ plates without any complaints. Plus, the cheese makes it feel like an indulgence, not a chore.
Simple Yet Impressive: Don’t let the elegant presentation fool you—this Cheesy Root Vegetable Gratin comes together quickly with everyday ingredients. Guests rave about it, thinking you’ve slaved away, but really, it’s all about layering and baking. It’s the perfect recipe to boost your cooking confidence.
Grab This Kitchen Scale Now — Best Precision Pick!

- Razor-Accurate Every Time: Dual-increment precision down to 0.1g — perfect for baking, meal prep, and portion control with g, oz, ml, and fl'oz modes.
- Smart Removable Bowl Design: Detachable bowl doubles as a protective case for compact storage. Tare function lets you weigh ingredients in any container with zero fuss.
- Built for Everyday Convenience: Auto-zero, tare function, low battery alert, overload indicator, and 2-minute auto-off to extend battery life — all in a sleek stainless steel build.
- ✓ "Perfect for baking — precise, lightweight, and stores easily without wasting counter space"
- ✓ "A game changer! Weighing ingredients is now way more accurate than measuring cups"
- ✓ "Love the 0.1g precision and backlight — best food scale I've owned. Highly recommend!"
⏰ Only a few items left in stock - order soon
Essential Ingredients for Cheesy Root Vegetable Gratin
Potatoes: Yukon Gold or russet potatoes form the starchy base that holds everything together in this Cheesy Root Vegetable Gratin. Their creamy texture when sliced thin absorbs the cheese sauce beautifully, creating that signature soft interior. I always choose firm ones to ensure they slice evenly without falling apart. In total, you’ll need about 2 pounds, peeled and ready to go.
Carrots and Parsnips: These add a subtle sweetness and earthiness that elevates the entire dish. Carrots bring a pop of color and beta-carotene, while parsnips offer a nutty depth that’s perfect for the Cheesy Root Vegetable Gratin. Slice them to about 1/8-inch thick for tenderness without mushiness—around 1 pound each works wonders in balancing flavors.
Cheddar Cheese and Cream: Sharp cheddar provides the melty, tangy core that defines Cheesy Root Vegetable Gratin, while heavy cream ensures a lush, velvety sauce. Grate 2 cups of cheese fresh for better melting, and use 2 cups of cream to coat the layers generously. This duo creates the indulgent topping that’s crispy on top and gooey below, making every forkful irresistible.
How to Make Cheesy Root Vegetable Gratin
Prep the Vegetables
Start by washing and peeling your root vegetables—potatoes, carrots, and parsnips—for this Cheesy Root Vegetable Gratin. Use a mandoline or sharp knife to slice them thinly, about 1/8-inch, which ensures they cook evenly and absorb the flavors. In my experience, uniformity is key; uneven slices can lead to some parts being underdone while others turn to mush. Toss the slices with a bit of salt as you go to draw out excess moisture, and preheat your oven to 375°F. This step sets the foundation for a perfectly layered dish that bakes up beautifully.
Assemble the Layers
Grease a 9×13-inch baking dish and begin layering your sliced vegetables, starting with potatoes as the base for stability. Alternate with carrots and parsnips, overlapping slightly to create a pretty pattern that will impress at the table. Pour half the cream mixture—warmed with garlic, thyme, and a pinch of nutmeg—over the first layer, then sprinkle with a generous handful of grated cheddar. Repeat for the second layer, pressing down gently to compact everything. The aroma at this point is already heavenly, hinting at the delicious Cheesy Root Vegetable Gratin to come—bake covered with foil for 45 minutes to let the veggies soften.
Bake to Golden Perfection
Remove the foil and top your assembling Cheesy Root Vegetable Gratin with the remaining cheese, breadcrumbs if desired, and a pat of butter for extra crispiness. Bake uncovered for another 20-25 minutes until the top is bubbly and golden brown, watching closely to avoid over-browning. The edges should be caramelized, and a knife should slide through the center effortlessly, indicating tender roots throughout. Let it rest for 10 minutes post-oven to set, making it easier to serve those gorgeous slices. This final step transforms the layers into a cohesive, comforting dish everyone’s sure to love.
Ingredients
- 2 pounds mixed root vegetables (potatoes, carrots, parsnips), peeled and thinly sliced
- 2 cups heavy cream
- 2 cups shredded sharp cheddar cheese
- 2 cloves garlic, minced
- 1 teaspoon fresh thyme leaves
- 1/2 teaspoon ground nutmeg
- Salt and black pepper, to taste
- 1/4 cup breadcrumbs (optional, for topping)
- 2 tablespoons unsalted butter, cut into small pieces
Cheesy Root Vegetable Gratin Instructions
- Preheat oven to 375°F (190°C). Grease a 9×13-inch baking dish.
- Slice root vegetables thinly using a mandoline or sharp knife. Season with salt.
- Warm cream with garlic, thyme, nutmeg, salt, and pepper in a saucepan over low heat.
- Layer half the vegetables in the dish, pour half the cream mixture over, and top with half the cheese.
- Repeat layering with remaining vegetables, cream, and cheese.
- Cover with foil and bake for 45 minutes. Uncover, add breadcrumbs and butter if using, and bake 20-25 minutes more until golden.
- Let rest 10 minutes before serving.

Pro Tips for the Best Cheesy Root Vegetable Gratin
Slice Evenly: Use a mandoline for uniform thickness to prevent uneven cooking in your Cheesy Root Vegetable Gratin.
Season Layers: Add a sprinkle of salt between each layer for balanced flavor throughout the dish.
Rest Before Serving: Allow 10 minutes post-bake so the Cheesy Root Vegetable Gratin sets up nicely for clean slices.
You Must Know
- This Cheesy Root Vegetable Gratin is naturally gluten-free if you skip the breadcrumbs.
- Root vegetables release moisture during baking, so no need to parboil them first.
- Fresh herbs like thyme enhance the earthy notes without overpowering the cheese.
- Overbaking can dry out the edges, so check at the 60-minute mark.
How to Store Cheesy Root Vegetable Gratin
Once cooled, cover your Cheesy Root Vegetable Gratin tightly with plastic wrap or transfer to an airtight container, and it will keep in the fridge for up to 4 days. For longer storage, freeze portions in freezer-safe bags for up to 2 months—thaw overnight in the fridge before reheating. To reheat, pop it in a 350°F oven covered with foil for 20-25 minutes until hot throughout, adding a splash of cream if it seems dry. This way, you can enjoy the flavors fresh-tasting every time.
Customizing Your Cheesy Root Vegetable Gratin
Feel free to swap in sweet potatoes or turnips for variety in your Cheesy Root Vegetable Gratin, keeping the total weight around 2 pounds. For a vegan twist, use plant-based cream and cheese alternatives, which work surprisingly well in this comforting bake. If you love spice, add a pinch of cayenne to the sauce—I’ve tried it and it adds just the right kick without overwhelming the roots. Experimenting keeps things exciting, just like in this lemon mousse recipe where tweaks make all the difference.
What to Serve with Cheesy Root Vegetable Gratin
Pair this Cheesy Root Vegetable Gratin with roasted chicken or a juicy steak for a hearty main course that complements the creamy side perfectly. A crisp green salad with vinaigrette cuts through the richness, adding freshness to the meal. Don’t forget crusty bread to scoop up any extra sauce, and a glass of Chardonnay or red wine rounds it out beautifully. It’s versatile enough for potlucks too, where it shines alongside other comfort foods.

Cheesy Root Vegetable Gratin
This beautiful Cheesy Root Vegetable Gratin is as beautiful as it is tasty. Sweet Potatoes, beets, and parsnips with cream and garlic baked to perfection. We love this side dish for special occasions like Thanksgiving.
Timing
Recipe Details
Ingredients
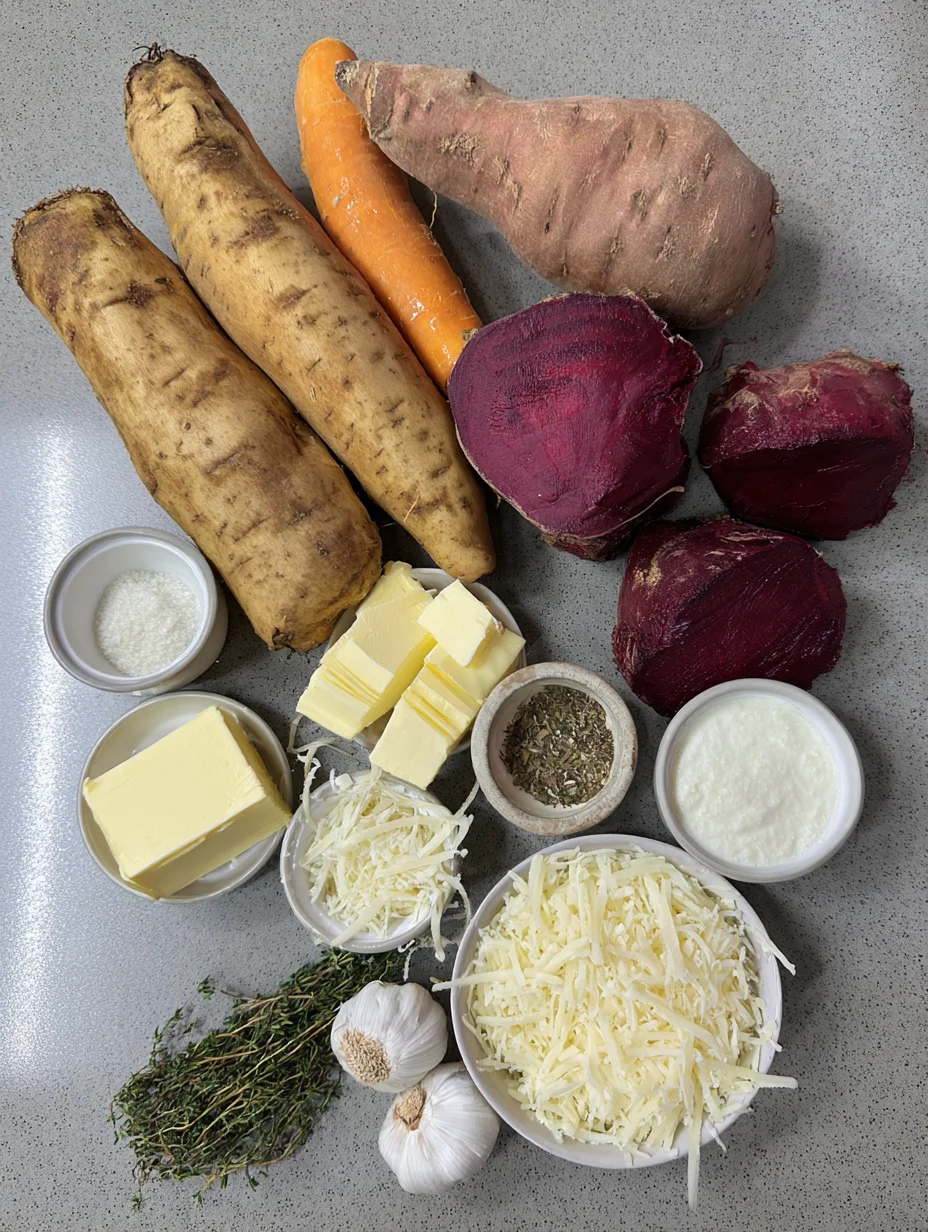
- 01 1 tablespoon unsalted butter (softened)
- 02 1-2 long sweet potatoes (about 2 inches thick, peeled)
- 03 3-4 large parsnips (ends trimmed and peeled)
- 04 3-5 small beets (peeled)
- 05 14 tablespoons heavy cream (divided (whole milk is fine, but mixture won't thicken as much or be as creamy))
- 06 4 ounces grated Parmesan (divided)
- 07 1 tablespoon fresh minced thyme (divided (plus more for garnish))
- 08 1 garlic clove (minced)
- 09 1 ounce shredded gruyere
- 10 salt and pepper (to taste)
Instructions
Preheat oven to 400˚F. Grease a 3 quart baking dish with butter.
Slice sweet potato, parsnips and beets into very thin rounds (using a mandoline is easiest) and transfer each vegetable to its own bowl.
Pour 4 tablespoons cream over each sweet potatoes and parsnips, and 2 tablespoons cream over beets. Top each bowl of sliced vegetables with ½ ounce grated Parmesan and 1 teaspoon minced thyme. Season each bowl generously with salt and pepper and toss together until all vegetable slices are well coated.
Pour remaining 1/4 cup cream into the bottom of a 3 quart (oval) baking dish and sprinkle with ½ ounce of Parmesan and minced garlic.
Grab a stack of sweet potatoes and line them standing up on a bias, at the top of the baking dish. Follow the sweet potato with a row of parsnips, followed by a row of beets. Repeat with the remaining sweet potatoes, parsnips and beets, creating 6 rows of root vegetables.
Season top of gratin with salt, pepper and sprinkle of remaining Parmesan.
Cover with foil and bake for 30 minutes or until vegetables are soft.
Uncover gratin and top with shredded gruyere.
Place gratin back into oven, uncovered, and continue to bake for an additional 18 to 20 minutes or until vegetables are fork tender, cheese has melted and the top has lightly browned.
Finish with a sprinkle of fresh thyme leaves. Serve.
FILED UNDER:
NUTRITION FACTS (PER SERVING)
Nutrition information is calculated using an ingredient database and should be considered an estimate. In cases where multiple ingredient alternatives are given, the first listed is calculated for nutrition. Garnishes and optional ingredients are not included.
Frequently Asked Questions About Cheesy Root Vegetable Gratin
Can I make Cheesy Root Vegetable Gratin ahead of time?
Absolutely, assemble your Cheesy Root Vegetable Gratin up to 24 hours in advance, cover, and refrigerate. Bake as directed, adding 5-10 extra minutes if starting cold. It’s a great time-saver for dinner parties.
How long does Cheesy Root Vegetable Gratin last in the fridge?
Stored properly in an airtight container, Cheesy Root Vegetable Gratin stays fresh for 3-4 days. Beyond that, the texture might soften, so freezing is better for longer storage. Always reheat to at least 165°F for safety.
Can I use different cheeses in Cheesy Root Vegetable Gratin?
Yes, mix in Gruyère or Parmesan for a nuttier flavor profile that pairs well with the roots. Just ensure it melts smoothly—I’ve found blends create the creamiest results. Stick to about 2 cups total for the recipe.
Is Cheesy Root Vegetable Gratin gluten-free?
It is naturally gluten-free without breadcrumbs, making your Cheesy Root Vegetable Gratin suitable for most diets. Double-check labels on cream and cheese for hidden additives. For extra assurance, serve with gluten-free sides.
What’s the best way to slice the vegetables for this recipe?
A mandoline slicer gives the thinnest, most even cuts for tender results in Cheesy Root Vegetable Gratin. If using a knife, aim for 1/8-inch thickness to match. Practice on one veggie first to get the hang of it.
Can I add meat to Cheesy Root Vegetable Gratin?
Sure, incorporate cooked bacon or ham between layers for a heartier Cheesy Root Vegetable Gratin version. It adds smoky depth without much extra work—just about 1 cup diced. This twist makes it a main dish too.
How do I make Cheesy Root Vegetable Gratin vegan?
Swap dairy with coconut cream and vegan cheddar shreds for a plant-based Cheesy Root Vegetable Gratin that still delivers on creaminess. Nutritional yeast boosts the cheesy umami. The baking time remains the same for great results.
Why is my Cheesy Root Vegetable Gratin watery?
Excess moisture from the veggies is common—pat slices dry before layering and bake uncovered longer if needed. Next time, salt and let them sit 10 minutes to release liquid. It won’t happen again!
Final Thoughts
Wrapping up, this Cheesy Root Vegetable Gratin has become a staple in my kitchen for its unbeatable comfort and ease—it’s the dish that turns ordinary roots into something extraordinary. I hope you’ve enjoyed this guide and feel inspired to give it a try soon; your taste buds will thank you. Head to the kitchen, gather those ingredients, and bake up some magic—what are you waiting for?