I’ve always had a soft spot for comfort food that comes together in minutes, and nothing hits that spot quite like a classic Turkey Melt. Picture this: crispy bread enveloping juicy turkey slices, gooey cheese bubbling over, and maybe a hint of tangy sauce—it’s the ultimate quick lunch that feels indulgent without the fuss. In my experience, whipping up a Turkey Melt on a busy afternoon has saved me more times than I can count, turning a simple sandwich into something truly satisfying.
What I love most about the Turkey Melt is how versatile it is; you can tweak it with whatever’s in your fridge. Whether you’re using leftover holiday turkey or grabbing deli slices, this recipe never disappoints. I’ve shared it with friends who swear it’s their new go-to, and honestly, once you try it, you’ll see why. Let’s dive into making your own delicious Turkey Melt—trust me, it’s easier than you think and way more rewarding.
Key Takeaways:
- Turkey Melt delivers a perfect blend of protein and flavor in under 15 minutes, ideal for busy days.
- With just a handful of ingredients, it’s a budget-friendly option that saves time on meal prep.
- The melty cheese and toasted bread create an irresistible contrast of textures and tastes.
- Use fresh bread and quality turkey for the best results in your Turkey Melt.
- Store leftovers in the fridge for up to two days and reheat gently to maintain crispness.
Why You’ll Adore This Turkey Melt
Quick and Effortless Prep: There’s something magical about how fast you can assemble a Turkey Melt—seriously, it’s ready before you know it. I remember rushing home from work and having this warm, comforting sandwich on the table in no time, making it a lifesaver for weeknight dinners. You’ll love how it fits seamlessly into your schedule without sacrificing flavor.
Grab This Chef Knife Now - Almost Gone!

- Stays Razor-Sharp: Ice-hardened blade keeps its edge longer than ordinary knives
- Superior Grip Control: Unique finger hole design gives you perfect balance and safety
- Built to Last a Lifetime: Premium stainless steel blade with elegant beech wood handle
- ✓ Finally, a knife that stays sharp and feels comfortable in my hand
- ✓ Professional quality without the premium price tag
- ✓ Makes meal prep faster and more enjoyable
⏰ Only a few items left in stock - order soon
Customizable Comfort: What draws me back to the Turkey Melt every time is its adaptability; add bacon for smokiness or avocado for creaminess, and it transforms. It’s hearty yet light, perfect for lunch or a light supper, and always leaves you feeling satisfied. Honestly, it’s the kind of recipe that grows with your tastes.
Family-Friendly Appeal: Kids and adults alike rave about the gooey cheese in a well-made Turkey Melt—it’s crowd-pleasing without being complicated. In my kitchen experiments, it’s become a staple for gatherings, easy to scale up for more servings. The warmth it brings isn’t just from the oven; it’s the shared joy of eating something delicious together.
Healthier Twist Possible: Don’t let the indulgence fool you; a Turkey Melt can be nutritious with lean turkey and whole-grain bread. I’ve tweaked it over the years to cut down on calories while keeping the taste bold, and it never feels like a compromise. You’ll appreciate how it balances indulgence with smart eating.
Essential Ingredients for Turkey Melt
Sliced Turkey: The star of the show, deli-style or leftover roasted turkey brings tender, savory protein to every bite of your Turkey Melt. I always opt for low-sodium varieties to control the seasoning, ensuring the flavors shine without overpowering saltiness. It’s versatile too—smoked turkey adds a subtle depth that elevates the whole sandwich. In my experience, about 4-6 ounces per serving keeps it hearty but not overwhelming.
Grab This Kitchen Scale Now — Best Precision Pick!

- Razor-Accurate Every Time: Dual-increment precision down to 0.1g — perfect for baking, meal prep, and portion control with g, oz, ml, and fl'oz modes.
- Smart Removable Bowl Design: Detachable bowl doubles as a protective case for compact storage. Tare function lets you weigh ingredients in any container with zero fuss.
- Built for Everyday Convenience: Auto-zero, tare function, low battery alert, overload indicator, and 2-minute auto-off to extend battery life — all in a sleek stainless steel build.
- ✓ "Perfect for baking — precise, lightweight, and stores easily without wasting counter space"
- ✓ "A game changer! Weighing ingredients is now way more accurate than measuring cups"
- ✓ "Love the 0.1g precision and backlight — best food scale I've owned. Highly recommend!"
⏰ Only a few items left in stock - order soon
Cheese: Gooey cheddar or Swiss melts beautifully, creating that signature pull-apart texture in the Turkey Melt. Freshly shredded cheese melts faster and more evenly than pre-packaged, which I’ve found makes a big difference in achieving perfection. It binds everything together, adding a creamy richness that contrasts the bread’s crunch. Choose based on your preference—sharp for boldness or mild for subtlety.
Bread: Sourdough or rye provides a sturdy base that toasts up golden and crisp around your Turkey Melt. I love how artisan breads hold up to the fillings without sogginess, enhancing the overall eating experience. Whole-grain options add fiber, making the meal even more nourishing. Slice it thick for better structural integrity during grilling.
How to Make Turkey Melt
Prep Your Fillings
Start by gathering your sliced turkey, cheese, and any extras like tomato or lettuce—lay them out so assembly is a breeze. In my kitchen, I like to let the cheese come to room temperature for smoother melting later in the Turkey Melt. Butter both sides of your bread slices generously; this is key for that golden toastiness. Now, layer the turkey on one slice, topping it with a generous handful of cheese to ensure even coverage. What I find interesting is how the warmth from the pan starts infusing flavors right from this step. Take your time here—rushed prep can lead to uneven results.
Grill to Perfection
Heat a skillet over medium heat, adding a touch of butter if needed for extra richness. Place your assembled Turkey Melt in the pan, pressing down gently with a spatula to encourage even cooking. You’ll hear that satisfying sizzle as the bread crisps and the cheese begins to bubble—aim for 3-4 minutes per side. Flip carefully once the first side is golden; the aroma alone will have everyone hovering nearby. In my experience, covering the pan briefly helps the cheese melt fully without over-toasting the bread. Keep an eye on the edges for that perfect char.
Serve Immediately
Once both sides are done, slide your Turkey Melt onto a plate and let it rest for a minute to set. Slice diagonally for easier eating, and watch how the cheese stretches invitingly. This is the moment the Turkey Melt truly shines—hot, melty, and full of flavor. Pair it with a side, and you’ve got a meal that feels restaurant-quality. I’ve made countless variations, but serving it fresh never gets old.
Ingredients
- 8 slices of sourdough or rye bread
- 12 ounces sliced turkey (deli or roasted)
- 8 ounces cheddar or Swiss cheese, shredded
- 4 tablespoons butter, softened
- Optional: 4 slices tomato, 4 leaves lettuce, mustard or mayo to taste
Turkey Melt Instructions
- Butter one side of each bread slice evenly.
- Layer turkey and cheese on unbuttered side of four slices; add toppings if desired.
- Top with remaining bread slices, buttered side up.
- Heat skillet over medium; cook sandwiches 3-4 minutes per side until golden and cheese melts.
- Rest briefly, slice, and serve hot.
Pro Tips for the Best Turkey Melt
Choose Quality Bread: Opt for fresh, sturdy loaves to prevent sogginess in your Turkey Melt.
Don’t Skimp on Butter: Generous spreading ensures even toasting and rich flavor every time.
Press While Cooking: Use a heavy pan or spatula to compress for maximum cheese melt and crisp.
You Must Know
- A Turkey Melt is best enjoyed fresh, as the bread can soften over time.
- Use medium heat to avoid burning the exterior before the inside warms through.
- Leftover turkey works wonders, reducing food waste while keeping costs low.
- Experiment with cheese blends for varied flavor profiles in your Turkey Melt.
How to Store Turkey Melt
If you have leftovers, wrap your Turkey Melt tightly in foil or place it in an airtight container to keep it from drying out. It stays good in the fridge for up to two days, but the bread might lose some crispness. To reheat, pop it in a skillet over low heat or an oven at 350°F for a few minutes until warmed through—microwaving works in a pinch but can make it soggy. I’ve found that storing components separately helps maintain texture if you’re planning ahead.
Customizing Your Turkey Melt
Feel free to swap in ham or chicken for the turkey, or go vegetarian with plant-based alternatives to keep the essence of your Turkey Melt intact. Add jalapeños for heat or cranberries for a sweet twist, especially around holidays. If you’re watching carbs, try lettuce wraps instead of bread. For inspiration on variations, check out our cheesy ground beef quesadillas recipe, which shares similar melty goodness.
What to Serve with Turkey Melt
A crisp green salad with vinaigrette cuts through the richness of the Turkey Melt beautifully. For heartier options, try kettle chips or sweet potato fries on the side. Don’t forget a refreshing iced tea or sparkling water to round out the meal. In my home, we often add pickle spears for that tangy contrast—it elevates everything without much effort.

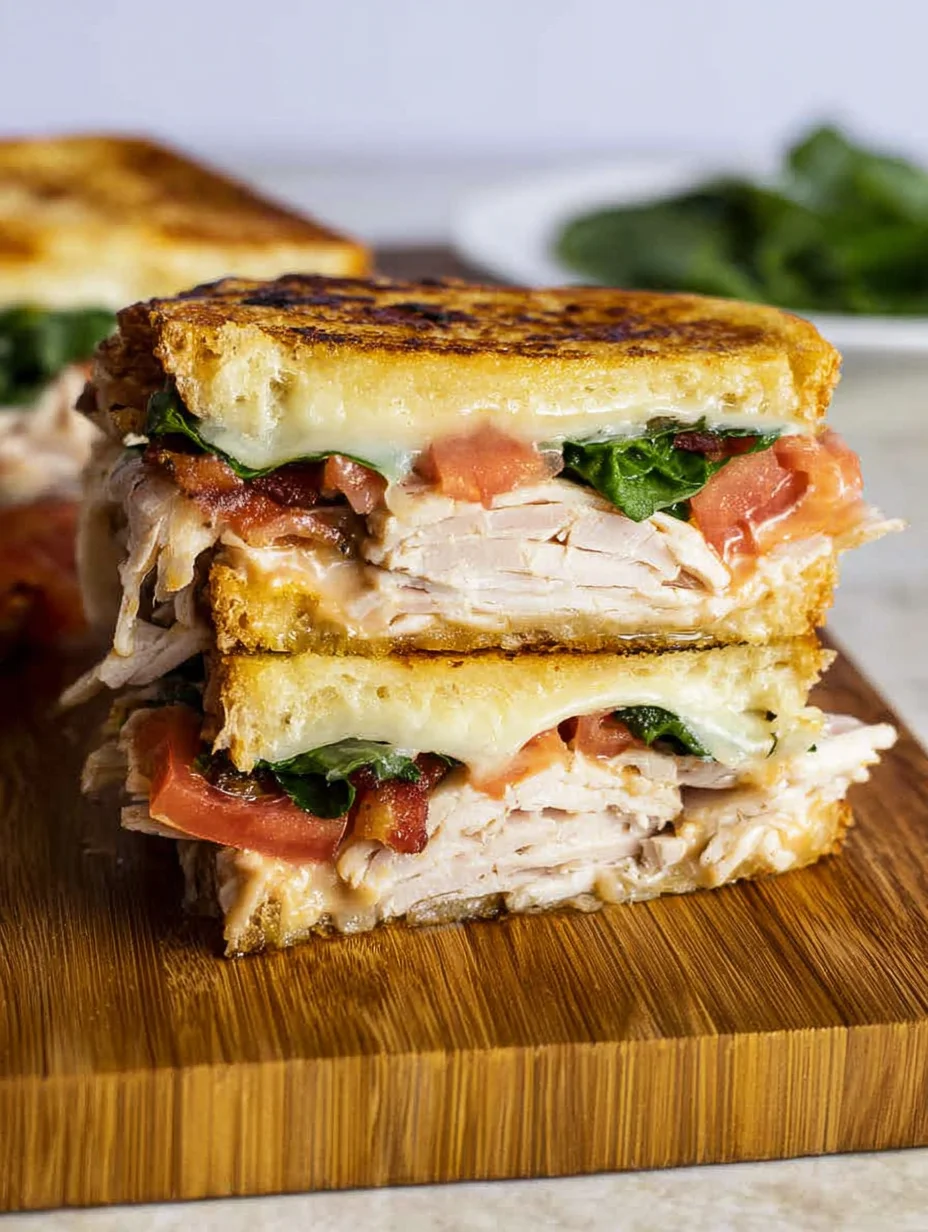
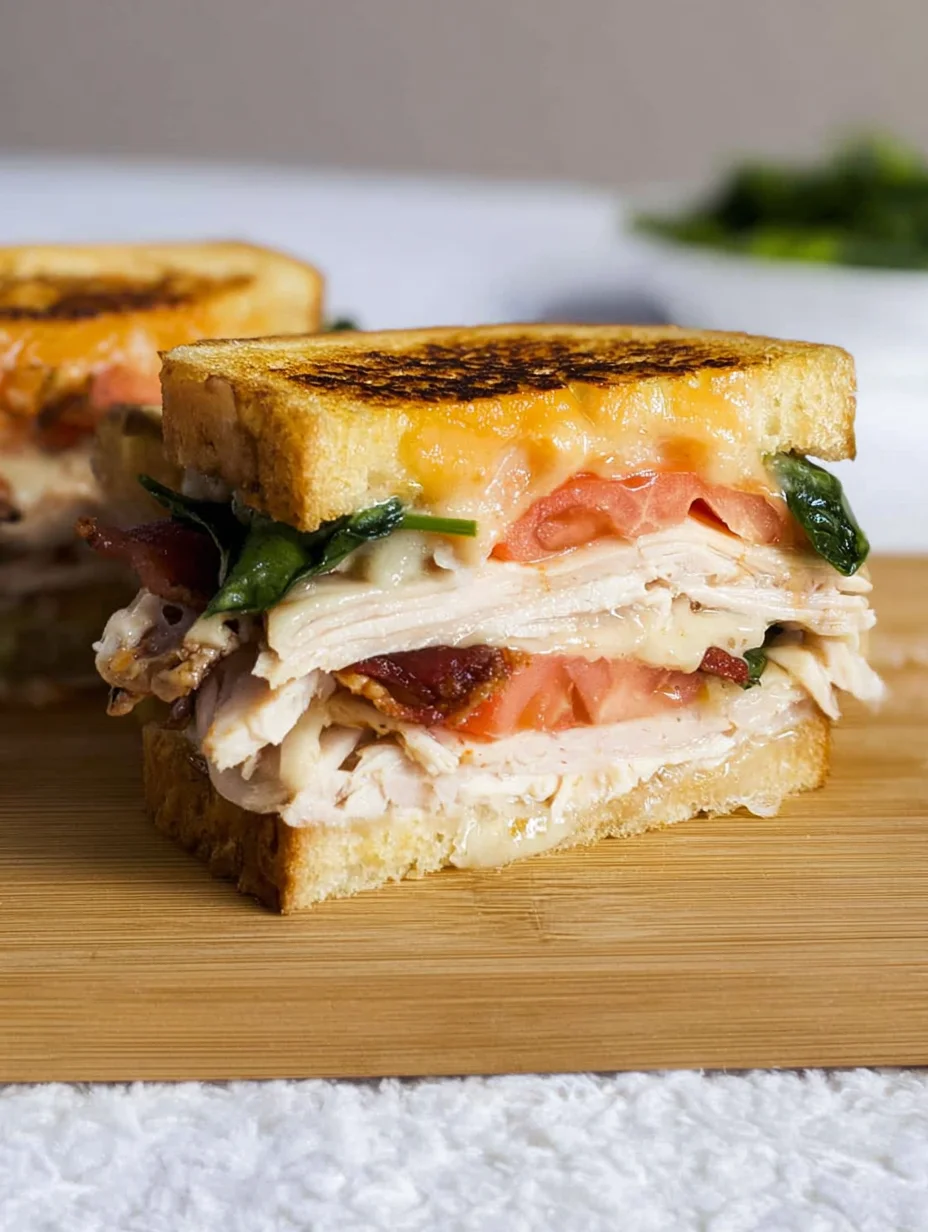
Turkey Melt with Cheddar, Spinach, and Bacon
The perfect sandwich for cooler weather, this incredible turkey melt is toasty, melty, and mouth-wateringly delicious. Enjoy it alone or alongside a warm bowl of soup!
Timing
Recipe Details
Ingredients
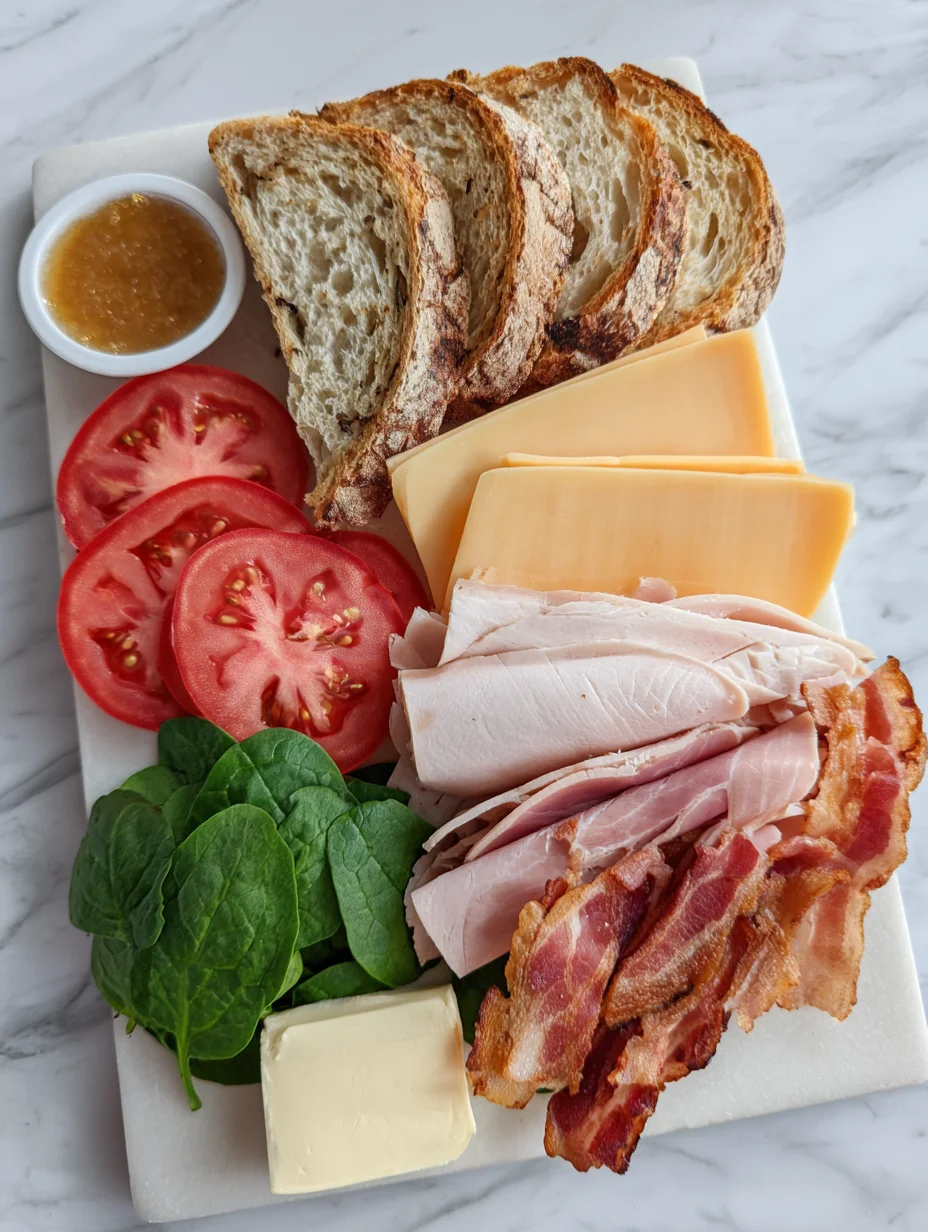
- 01 4 slices sourdough (or thick, crusty bread of choice)
- 02 2 tablespoons honey mustard
- 03 2 slices white cheddar cheese
- 04 4 slices deli turkey
- 05 thin tomato slices (from 1 medium red tomato)
- 06 ½ cup fresh baby spinach
- 07 4 strips cooked bacon
- 08 2 tablespoons butter (softened)
FILED UNDER:
NUTRITION FACTS (PER SERVING)
Nutrition information is calculated using an ingredient database and should be considered an estimate. In cases where multiple ingredient alternatives are given, the first listed is calculated for nutrition. Garnishes and optional ingredients are not included.
Frequently Asked Questions About Turkey Melt
Can I make Turkey Melt ahead of time?
Yes, you can assemble the Turkey Melt up to a few hours ahead and store it in the fridge, but cook it fresh for the best texture. Prepping ingredients separately works well too, saving even more time on busy days. Just avoid toasting too early to prevent sogginess.
How long does Turkey Melt last in the fridge?
Your Turkey Melt will keep for up to two days when stored properly in an airtight container. Beyond that, the bread starts to soften, so it’s best eaten soon. Reheat gently to revive the flavors.
Is Turkey Melt gluten-free?
Not by default, but you can easily make it gluten-free with appropriate bread swaps. Look for gluten-free sourdough or use corn tortillas for a fun twist. It’s a simple adaptation that keeps the delicious Turkey Melt experience intact.
What’s the best cheese for Turkey Melt?
Cheddar offers a sharp bite, while Swiss brings mild nuttiness—both melt wonderfully in the Turkey Melt. Experiment with provolone for creaminess. In my tests, a blend gives the most balanced flavor.
Can I bake Turkey Melt instead of pan-frying?
Absolutely, baking at 375°F for 10-12 minutes works great for multiple Turkey Melts. It evenly toasts without constant watching. Brush with butter beforehand for that crisp exterior.
How do I make a spicier Turkey Melt?
Add sliced peppers or a dash of hot sauce to your Turkey Melt fillings before cooking. Sriracha mayo on the bread amps up the heat subtly. It’s an easy way to customize without overpowering the turkey.
Is Turkey Melt kid-friendly?
Yes, its simple, melty appeal makes the Turkey Melt a hit with kids—cut into fun shapes if needed. Keep it mild by skipping strong add-ins. For more family ideas, see our better than Starbucks egg bites recipe.
Can I use oven-roasted turkey in Turkey Melt?
Leftover oven-roasted turkey is perfect for the Turkey Melt, adding homemade flavor. Shred or slice it thinly for even distribution. It reheats nicely, making it ideal for post-holiday meals—check our high-protein honey garlic shrimp for more protein-packed tips, though not turkey-specific.
Final Thoughts
From start to finish, this Turkey Melt recipe captures everything I love about simple, soul-warming food that doesn’t require hours in the kitchen. Whether you’re a sandwich newbie or a pro, it’ll become a favorite in your rotation—promise. Give it a try this week, and let me know how your Turkey Melt turns out; I can’t wait for you to enjoy it as much as I do.